Saturday 30 March 2024

"KILN CARVING" with glass!

 The title may be a little confusing to some of you.........I can hear you thinking "how does she carve GLASS?  Surely that is not possible?"


Well, you are right.  glass is not wood, or stone.    If I decided to go at a piece of glass with a hammer and chisel, I would end up with a pile of glass pieces and dangerous shards. But there is a way to "carve" into the glass....by using the kiln to do it!

There are different ways to "kiln carve" .“Kilncarving” is a term coined at Bullseye (manufacturers of art glass for glass fusing)  to describe a kilnforming process that achieves a bas relief, textured, or sculpted look in glass. The process involves cutting a pattern or design in ceramic fiber paper, then stacking glass on top of the pattern and firing the piece in a kiln. During firing, the underside of the glass slowly softens  and conforms to the ceramic fiber paper pattern, assuming its contours and textures.  Here you see a "tree of life" pattern, the deep texture is at the back of the piece.


Alternatively, the same effects can be achieved by using a ceramic "texture tile", produced specially for this purpose.  The tile needs to be treated with a "glass release" product, so that the piece lifts off easily after firing, and can then be formed into a bowl, or vase, if required, during a second firing.

The piece can be decorated...I added real gold detail to the tree of life, by fusing the decoration onto the piece before the slumping stage to give it a gentle curve:


I personally enjoy the look of textured glass, I believe the kiln-carving makes it look rather special.  Unfortunately, I have badly shaky hands, so carving fibre paper is not on, I might end up minus a few tips of fingers!...........so I generally use texture tiles and I am grateful they exist! Here are some of the pieces I have made to date.  I plan to try a vase next, with the lovely deep texture on the outside...watch this space! 

I used rainbow iridised glass for this piece, the iridescent side sparkles in the light.

Here is the other, smoother side:


If a texture tile is used, it can be re-used many times, and by selecting different shapes of glass, different types and sizes of finished pieces can be created:

 By cutting the glass into a circle I was able to use the square texture tile to give me a circle for a bowl, and the resulting organic wavy edge really works, I feel, for the Sea-Theme piece.  
Here is a close-up of this gorgeous texture design.   The transparent glass is thinner where it is sitting on top of the raised design on the tile, which gives the different shades of blue-green.


Working with either your own designs cut from fibre, or a texture tile, bought or created yourself, will give you beautiful glass with an unusual look, and anyone who does not work with glass and kilns, will have no idea how you achieved this!

For further information about working with your own designs cut from fibre:  click here 

Jackie


Monday 4 March 2024

COLOURFUL GLASS ACCESSORIES

Some of you may know that I make glass accessories, employing a technique related to the fancy-sounding "Pate de Verre" technique, using glass paste, made from finely ground glass and a binder of some kind, which is fully fused in a kiln.  My pieces are formed in moulds, frozen until solid, de-moulded and then fused in the kiln for 12-14 hours.

 I sell them for use as "accessories" for glass artists to add to their glass works.  It is not always easy for me with my annoyingly shaky hands, but I do manage it, with time and patience.  I thought I would simply share some of the photos with you and also, tell you something about Starfish/Sea Stars, which I sometimes make.  


Sea stars live underwater, but that is where their resemblance to fish ends. They do not have gills, scales, or fins. Sea stars live only in saltwater. Sea water, instead of blood, is actually used to pump nutrients through their bodies via a 'water vascular system.'

Also, sea stars move by using tiny tube feet located on the underside of their bodies. Adult sunflower sea stars can move at the astonishing speed of one meter per minute using 15,000 tube feet. Tube feet also help sea stars hold their prey. Sea stars are related to sand dollars, sea urchins, and sea cucumbers, all of which are echinoderms, meaning that they have five-point radial symmetry. However, this does not mean that all sea stars have five arms and species with 10, 20, or even 40 arms exist! If one of these arms is lost, a sea star has the amazingly ability to regenerate it.    
fun facts I bet you did not know!  
Here are some of the sea-themed pieces customers buy from me:  they are the most popular so far.


the background here is a printed paper I found!


and some which are pond-themed:


and some recent flocks of birds!  great for adding to seascapes, or landscapes:


These little pieces can help to make a simple nightlight special, will make  suncatchers fascinating, can be used to decorate picture and photo frames ( can be glued on),  or used to create a complex pictorial scene, a cute candle screen, they can decorate lantern glass, or even tiles in the bathroom!
  
IDEA:
They are also great for kids to use, give them some ceramic tiles,  a selection of my pieces with some glue, and they can easily and safely create the most fabulous little "scenes" which can be framed, or set upon an easel.  Blue Onyx tiles would make a perfect deep sea background!  I tried this with a 7 year old, she said she had the best fun ever!

  I sell my accessory pieces on Etsy..... www.jackiesimmondsstudio.etsy.com

I like making them, and people seem to enjoy using them.  Win win.

Jackie 


Friday 8 September 2023

UNPREDICTABLE BUT NICE SURPRISES IN GLASS

I have found that working with glass is challenging in a very different way to anything I have worked with before...I have to work in collaboration with a kiln, as I used to do with my enamelled copper bowls, which sadly, I can no longer make as it is not safe for me to take red-hot copper out of a kiln balanced unsteadily on a trivet!  

However, working with enamel brought me to glass;   glass responds to the heat in the kiln in unusual ways and is NOT easy to control.  I guess someone with a better memory than I have, and who is more organised and keeps careful notes, would cope rather better than I do.   I have to look up kiln schedules, and set kiln programmes, and I have to double-check every time.  Getting older certainly does not help, and when the weather is hot and humid, as it is this September after a long, cool July and August, my head starts to spin!

That all said, I decided to try some experimental glass work this week, and  although I am  hot ,sticky and tired from a bout of Covid which has reared its ugly head this week, I thought I would share the results so far, to show you how magical glass can be as it melts and reforms inside the kiln.  This piece really cheered me enormously.  I achieved thanks to information and inspiration from Val Cox's group on Facebook, "Val Cox's Fusing Frit workshop",  together with information from Melissa Penic's book "Remarkable Recycling Techniques for fused glass"- her technique is called "Stack and Slide"..... plus a bit of guesswork, prayer and finger-crossing on my part!  I used all Bullseye glass.

Here is a lay-up of glass - several sheets of glass, topped with glass pieces, glass powder and glass "confetti", in the hope that I might achieve an interesting and unusual free-form piece, to be used at a later date.


I knew this would gradually melt, slide outwards, and form a "patty" of glass with an abstract design on it.  I had no idea what kind of shapes I would get....the kiln decides for me!  My only control was with the colours I chose, and I decided to go with "complementary colour" from the colour wheel.

This is the resulting sheet of glass which gave me a "WOW" moment when I opened the kiln:


and here are a few close-ups of certain areas, as this is much bigger in real life than this photo, and I just love the way that the glass has spread,  behaved and taken on a life and shapes of its own:
Here, you can see how the glass has "flowed" and created washes of colour, and beautiful watercolour-effect shapes.  Amazing.


Here, the glass has formed "cells" of colour...or rather, empty cells surrounded by colour


There is a lovely feeling of movement in this section, and a beautiful variety of both small and large shapes and linear movements....it is almost like some kind of abstract landscape. AND.... I cannot help but wonder what it would look like seen upside down............


Now that really is an abstract landscape. Squint your eyes, you too may see it as I do.....

I do so love being given gifts like this, creative surprises which make me see the world in new ways.  Watch this space....next I have to make it into something lovely........

Jackie Simmonds


Monday 17 July 2023

SIMPLE SCREENPRINTING FOR GLASS ARTISTS


Since I had a stroke which left me with shaky hands , drawing is a BIG problem, BUT I have found a way to produce images on glass which require no drawing skills at all!  Once upon a time, creating images on glass required lots of complicated procedures, messy chemicals, darkrooms, UV lights, and all sorts.

Today, this is not the case.  It is possible to use ready-made screens with ready-mixed pastes (enamels) and produce wonderful images on glass without all the palaver. If you do not like the screens available, and can draw or have photos you might want to use, there is the option of having custom screens made for you.

  Here are a few of the pieces I have made:


The great thing about screenprinting in this way is that I still have these screens, and can reproduce the images as often as I want, for panels, bowls, candle screens, all sorts.
There are videos on the internet showing how to work with enamels on glass and how to do screenprinting, but I have found that the problem with videos is the difficulty of remembering all the steps involved when you come to do it yourself. I decided to write a beginner's tutorial, and to my great surprise, it seems to be selling well - perhaps others also find videos are entertaining to watch, but they do need step by step instruction too!

Here is one of the "steps" photos:


If you have not tried screenprinting on your glass, you might enjoy my tutorial.  I am about to list it in my Etsy shop, which is jackiesimmondsstudio.  If you wish, you can contact me directly as an alternative - jackiesdesk@gmail.com


The tutorial is 17 pages, full of information and loads of step by step photos to print off to follow.  It has been well received so far, with nice comments from  happy buyers!
You may spot that on Facebook on one of the glass forums.

It is worth trying....fun and very satisfying.
Jackie


Wednesday 15 March 2023

NO NEED TO CUT THE GLASS!


Thank GOODNESS I have taught myself how to create glass items without the need to cut any glass at all.

Glass comes in crushed form....powder, or "frit" which is glass crushed into various sized pieces - fine (like sand), medium (coarse sand) and large (like small stones) frit can be purchased, or created.

Then, items of glass can be made using either powder or frit, which means there is no need to haul large sheets of glass out of units and onto tables, to be cut.  Sheet glass is very heavy, and if, like me, you have problems with mobility, balance and strength, it can be exhausting to lug around.  Also, I have problems with "shaky hands" (getting older is not for the faint-hearted) and my ability to cut,  draw or paint is now severely limited.

BUT I can sit at a table, fill a mould with either powder or frit, and "cast" my glass pieces, which is the term used for certain methods. Then, the piece goes into the kiln, my silent partner.   

In the past artists have used this technique to create wonderful pieces, via a process called Pate de Verre -but it is long and complicated.  It is still used today by some marvellous glass artists .   Here you see students in a class being taught how to line a plaster cast with powder: 

This picture shows students creating and then filling their own plaster moulds.  Making a plaster mould is a very messy, tricky, time-consuming process.  Filling is not much better!  sometimes a process called "lost wax" is involved, which means creating a model from wax, pouring plaster over and around the model, and then melting the wax away so that glass can then replace the wax.............need I say more.  Only for the very patient.  That is not me. 


Here is a finished, modern piece:


Often, the plaster is "broken" away from the glass and cannot be re-used.


But for those with limited energy and stamina, there are more simple approaches to casting glass pieces. These simpler methods are personally giving me a new lease of life!  I have previously shown some of the pieces I have produced, and here are  more to show you.   I really want to say that I am writing this mostly to encourage artists who find themselves struggling with problems following surgeries, like me ....it might encourage you to know that there may be less taxing approaches worth trying.

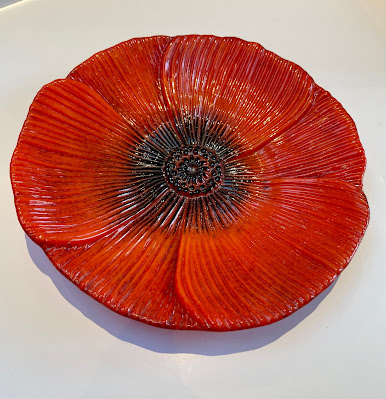
The bowl at the top of this page is a good case in point.  Hard to believe this is just made from the crushed glass below it, isn't it! Red Frit and black powder were placed into a ceramic mould, and fired to a specific temperature which allows the glass to melt, reharden and soften into this beautiful form.  That mould can be reused many times.


This lovely glass dragonfly is made entirely from "frit", some of the frit is transparent, some opaque.  


These little mermaids and octopuses (octopi? octopusses?) are created entirely using glass powder and water, packed carefully into silicone moulds.  Again, these moulds can be reused.  They are generally created for other purposes - icing for cakes is one - resin is another - but they can be used for glass too.   It is not good to get powder in the lungs, so I have to work wearing a mask, which is hilarious when people pop their heads into my studio, and jump out of their skins when they see me.  The silicone cannot go into a kiln, so they go into a freezer first...and the demoulded pieces are then fired.

This framed heart is made from glass butterflies, made from a mix of powder and water!   It took a while to make so many...each one had to be frozen first to form the shape, using moulds...then removed from the mould and fired.  Then they were secured to the glass in the frame.


This piece was made from fine and medium frit, cast in a ceramic mould, cleverly made just for this purpose.  The detail of the veins on the leaves can be seen as the glass is semi-transparent. 

Here is a glass powder piece.  I plan to secure it to a circle of glass, drill a hole in that for a wire or ribbon, to hang in a window as a light-catcher. 

Finally, here is a picture frame made for my daughter's wedding to come.   I did have to create the frame from sheet glass - cutting the glass required quite an effort and firing to create the frame without corner seams was not simple.... but I made the decorative pieces for it from powdered glass.  I think they give the piece a unique and special look.


Without these marvellous, comparatively simple methods of working with powdered or crushed glass, I would be watching a LOT more tv!!!

Jackie Simmonds


Monday 29 August 2022

Is it a tree trunk or is it a ladder?

 I often find myself biting my tongue when looking at glass images of Silver Birch, or Aspen trees, created in glass.  All too often, the artist has simply cut strips of white glass, and painted a few horizontal lines on them, and plopped them down onto a background.  They look like white ladders, frankly, dodgy ones, and not the least bit like nicely observed, natural-looking tree trunks...they have no personality, no character, and look stiff and unrealistic.  These two sketches show what I mean:

On the left, we have a badly-drawn ladder with some floating rungs.  On the right, a tree trunk with dark markings.

Often, light gives us a sense of "form" - the roundness of the trunk, as it illuminates one side, and casts a shadow on the other.  But there are times when the light is subtle, and there is no obvious shadow. Then, we need to use the information provided by the bark.  And the rules of perspective.

PERSPECTIVE FOR CYLINDRICAL FORMS.

At our eye level, horizontal marks on trees will be horizontal.  As we look DOWN toward the roots, the marks will "dip", and as we look up towards the sky, the marks will appear to arc upwards.  This is a rule of perspective.  It will be very obvious when  you are close to a tree;  much less obvious from further away.   You can prove this to yourself with a drinking glass or even better, a cardboard tube. Hold the top rim at eye level. It will be straight. Lift the glass/tube, and look UP at the rim. It curves upwards. Drop the glass/tube, and look DOWN at the rim. It will curve/dip downwards.


Have a look at the images below, they show what I mean:


Notice how the light hitting the tree trunk from the left is helpful to add to the sense of a cylindrical form, but even without the light, as in the drawing, you can sense the form between the two upright lines.

It is worth bearing this simple rule in mind when creating images with white  trees.  There are exceptions;  trees leaning away from you, trees leaning towards you,  unusual bark smarks...but a bit of observation is the key, and you must bear in mind that YOU are the artist, and YOU need to help your viewer to see a tree rather than a ladder!!!

Jackie Simmonds


Wednesday 3 August 2022

Using a FREEZER to make glass pieces, and using GLASS CLAY !!!

The great thing about working with a medium like glass, is that there is always something new to learn .  Glass artists are experimental souls, and some come up with inventions or ideas that they are happy to share with others.


I recently found two new methods of creating dimensional "elements" to add to my work.  Once upon a time, I would have simply painted dolphins onto my glass...but painting is really tricky with horribly shaky hands;  this new method eliminates that problem.  I now can "make" dolphins, shells, seahorses, tropical fish...even mermaids...if I want to, and they are made with GLASS POWDER.  Quite amazing!!!!  Here are some examples;  they are placed onto glass tiles I had in the studio which made perfect backgrounds.


To create these pieces, I used a process called "Freeze and Fuse".  I dislike the title, but it is what it is.  I put powder into moulds, together with water to create a heavy kind of paste, it is packed tightly into the mould and then I freeze the pieces.  It is similar to a process called Pate de Verre, though a LOT simpler and less effortful. When frozen, they are turned out onto boards and fired in the kiln.  And then, I have little glass pieces to use in my work!  Here is one finished piece to show you what can be done with them:


The individual panels on the lantern would also look really lovely framed, here they are on a white background so you can see the "watery" look which does not show up well in the photo.  The painting work is very transparent, so against my pond, you cannot see it well.


Then, I discovered yet another method of producing pieces in the mould....using something called Modelling Glass, a product which mixes with glass powder to produce something very much like clay.  This can be pressed into moulds, dried, and then fired.  Again - something created by a glass artist, and it is marvellous.


These pieces aare dried, but not fired yet.  I was able to file off edges and tidy them up, just as one might do with pottery clay.  Then I fired them.


Now I am selling these little components for others to use.  

And trying out other rather ambitious ideas of my own...this next piece is a work in progress...am still trying to decide whether to make it a gently sloping dish, or one with a square centre. I hope you can see that the flowers , tendrils and leaves are "proud" of the surface...you can feel them distinctly.  I have tested the ability of the 3D components to "slump" (bend) in the kiln, and they can, so it is quite exciting, and scary, to see what will happen.


I am immensely grateful to have found these new processes, they keep me occupied and creative.